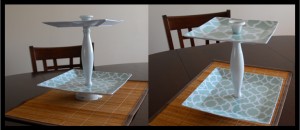
Modern Chic Tiered Serving Tray
I entered this in Studio Five’s $5 Craft Challenge today. It was so fun to make and turned out so cute that I want to make many, many more. So if you receive one as a gift….. 🙂
My favorite part about this project is it’s versatility. The components dis-assemble so that you can 1) store it flat 2)Use interchangeable plates to change the look 3) still use the candle stick as a candle stick!
The tiered effect is created by using a simple candlestick that unscrews at it’s base and at it’s top (this is actually quite common….visit the thrift store and start trying to untwist the older (usually gold) candle sticks. They are also often times hollow in the middle which allows you to make one this way which is where my inspiration came from (her whole blog ROCKS). Doing it Amberlee’s way also makes it so you can use a candlestick that only unscrews at the base…it is a little more money with the addition of the allthread and drawer pull, but well worth it for the finished product. I’ll post some pics as soon as I complete some using Amberlee’s method.
So all I did was spray paint my candlestick, screw holes in the middle of my plates (you can use ceramic or melamine plates), and screw it all together. Doesn’t get much easier than that! You’ll want to use a ceramic bit if you try tackling this project, otherwise you are at higher risk (the risk is always there) of breaking the plate as you screw the hole. Try a little masking tape on top and bottom of the plate where you’ll be screwing your hole as well.
Do you like?
Note: oooh…it would also be pretty to add a gorgeous, fresh white flower to the top to finish it off….just put a little water in the top of the candlestick and place the flower with an ultra-shortened stem in. It will last long enough for your event…







Lauren
Found your site through AmberLee’s post on her DIY cupcake tray. Love the simplicity of your design! Hers seems simple enough, but yours is even easier! Can’t wait to try it out!