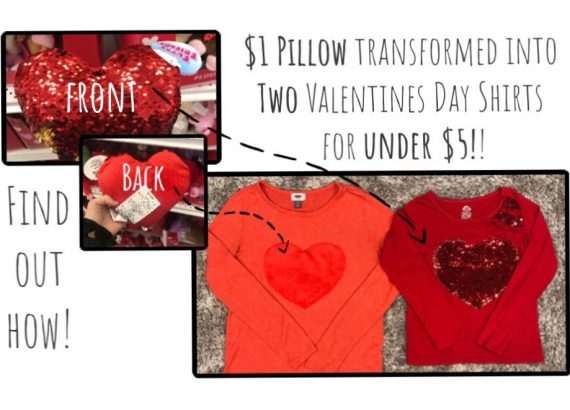


Valentine’s Day Shirts from a Dollar Store Pillow
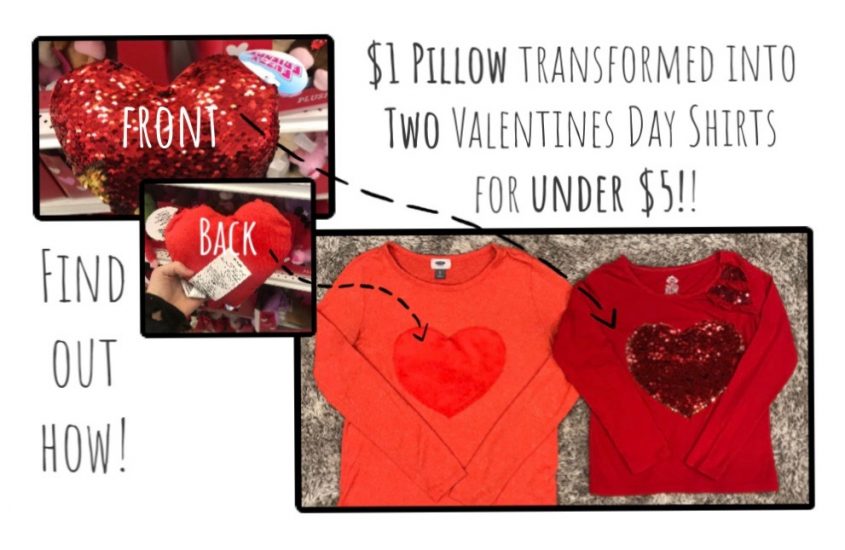
Would you believe I made both of these cute Valentine’s Day shirts for a combined total of under 5 dollars?
I did! And I am going to show you how you can make Valentine’s Day shirts from a dollar store pillow too! As always, Dollar Tree has some fun Valentine’s Day Decor this year. I spotted these heart-shaped sequin pillows and immediately thought of turning it into Valentine’s Day shirts for my girls as they love to coordinate their outfits for the current holiday. I used both the from reversible sequin side of the pillow as well as the back velvet to get the most bang for my buck.


These DIY Valentine’s Day Shirts from a dollar store pillow are finished in just 4 simple steps!
Here’s a list of materials you will need to make these simple red hot heart shirts:
- Dollar Store Sequin Heart Pillow (in Valentine’s Day section of store) $1. They have red/gold as well as red/silver. Update: As of 2/10/20 my dollar store still had several of these pillows in stock!
- Red sweater or shirt. I found my two shirts at Goodwill. The sequin ruffle shirt was $1.50 and the red sweater from Old Navy was about $2.
- Pellon wonder under or something similar like HeatNBond.
Step 1: Prepping
Un-pick the pillow and pull out the stuffing. I just tossed mine because it wasn’t very high quality, but you could hang onto for a future project.
Step 2: Tracing and Cutting
Trace the heart onto the rough side of the adhesive interfacing. My heart was NOT perfectly symmetrical…tracing it onto the rough side of the adhesive interfacing makes it so that it will fit perfectly when you iron it onto the under side of the sequin heart. Cut the piece of adhesive interfacing you just traced 1/4 inch inside of the line you traced. This allows you to re-crease the pillow in preparation to sew it onto your shirt. This step will make more sense as you do it!
Step 3: Ironing
Now, iron on the adhesive interfacing to the wrong side of the sequin heart. The rough side of the adhesive interfacing will face the wrong side of the sequin heart and you will iron over the paper backing of the adhesive interfacing. Pull off the backing paper after it has cooled. Now, you will re-fold the crease of the heart so the edges are tucked back under and position it on the shirt where you’d like it to end up. Iron it onto the shirt. The adhesive interfacing will stick to the shirt eliminating the need for pins when you sew around the heart!
Step 4: Sewing
Now you can simply sew around the edge of the heart using a straight stitch as close to the edge as you like. This will impede the outer edge of the sequins from being able to reverse but it’s no big deal. If some of you sewers out there know a better way to do this, let me know in the comments!
Repeat steps using the velvet back of the heart pillow to get two shirts out of 1 pillow!